
How to Backyard Compost
- Edgewater Environmental Coalition
- Nov 14, 2023
- 4 min read
Why Backyard Composting?
Harvest humus, a nutrient-rich soil amendment, for keeping your plants well nourished!
Divert compostable materials from the landfill as the slow degradation of such materials in landfill conditions releases a gas mixture which harms local communities and contributes considerably to climate change.
It’s easy and rewarding once you get the hang of it. Here’s a guide to get you started.
How to Compost in the Backyard?
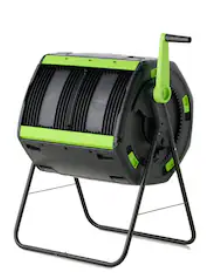
There are two main methods for backyard composting on city lots as there are regulatory and practical limits to a more traditional compost pile (the pictures are just examples without endorsements):
A compost bin: a sturdy container with a secured lid on top to add fresh materials (while preventing access to critters) and openings at the bottom to retrieve finished compost.
A compost tumbler: a usually smaller container on legs, in which the materials added for composting are turned over more frequently.
How to Decide between a Tumbler and a Bin?


It helps to have a rough understanding of how outdoor composting works.
It needs microbes which will naturally come if the conditions are right.
Thus it needs aeration to provide access for those microbes and the oxygen they need to thrive (which are not given in a landfill). Accordingly, both composter types have small holes to provide that access. (Avoid composters with bigger holes which would give access also to unwanted critters.)
Cutting or shredding materials into smaller bits before adding them as well as ‘turn-over’ and mixing of materials improves the aeration further and ‘seeds’ newly added materials with the microbes already present.
Heat also facilitates the composting process. Some of this heat is generated in the process itself; more is provided by the sun. Thus any backyard composter should be placed in a sunny spot while, inevitably, the process will slow down in cold temperatures.
Additionally, the composting process needs a balanced humidity level. This is partly provided by mixing dryer ‘brown’ materials (as straw and dry autumn leaves) with ‘green’ ones containing water (like kitchen scraps). Dealing with the materials you have on your hands, though, it might be necessary also to either drain or add water once in a while.
So what’s the difference between a tumbler and a bin?
While bin-composting also profits from some ‘turn-over’ once in a while (use e.g. an old garden fork or such), the aeration and mixing of materials is way improved by the more frequent turn-over in tumblers, thus shortening the time for composting.
A bin generally has a 2-3 times bigger volume than a tumbler, thus gathering a bigger amount of materials, especially through the winter until the composting process speeds up again in spring.
Most compost bins are open at the bottom for drainage. Thus adding water if necessary, on the other hand, doesn’t have to be monitored as closely as in tumblers – though the ‘compost tea’ drained from tumblers is also priced for its nutrient-rich fertility.
Composting bins clearly separate freshly added materials (at the top) and the finished compost (harvested at the bottom). Tumblers 'tumble’ this easy separation, though a ‘two chamber tumbler’ or using two tumblers (one for fresh materials while the compost finishes in the other) can help to solve this issue.
Thus, all in all, tumbler-composting is a more hand-on affair while compost bins can be kept with little attention. However you decide, though, get a solidly made composter for your backyard and a smaller container with a loosely fitting lid to gather kitchen scraps before emptying this smaller container into your backyard composter. (Don’t worry if mold should start to grow in the kitchen container as the further composting process will take care of that.)
How Many Parties Can Share One Backyard Composter?
This rather depends on the parties you would share it with and how much you agree about the rules for filling it and caring for it. Be aware, though, that per Chicago ordinance the compost must be used onsite. If there is yard waste to deal with, be aware also that this can overwhelm even the best kept composting tumbler or bin just for only one party occasionally.
For this and other reasons, backyard composting, though easy to do, is only one way to divert compostable materials from the landfill. Community composting on spots in public parks and community gardens is another, as is hauling excess organic waste to industrial composting sites which, done right, can even produce climate neutral energy. The EEC is committed to work on utilizing all such venues to divert compostable waste from landfills.
Which Organic Materials Can Go Into a Backyard Composter?
In a prominent distinction, they need a good mixture between ‘brown’ materials which are dryer and more carbon rich and ‘green’ materials which contain more water and nitrogen:
‘Brown’ (rather dry) are e.g. dry leaves, woody materials like the twigs of shrub and tree clippings, plant stalks, corn cobs and straw, paper and cardboard.
‘Green’ (containing more water) are e.g. fruit and vegetable scraps, lawn clippings, flower cuttings, and freshly plucked weeds.
Not all materials neatly comply, though: very welcome in compost are also crushed egg shells (high in calcium), used tea leaves and coffee grounds (brown, but rather ‘wet’).
At the same time, there are ‘no-nos’ and materials to be thoughtful about:
No fat; no meat, fish, or bones; no dairy; no pet waste and cat litter! Those are better dealt with in industrial composting sites which can sustain higher temperatures.
No plastics; no metal; no waxing; no glossy or colorful print either! (Thus, e.g., remove stickers from fruit skins while, also, the skin of citrus fruits is often waxed).
Be careful about adding the clippings of invasive or otherwise aggressive plants; seeds, at least bigger and/or more aggressive ones; diseased plants, and those treated with herbicide as your backyard composter might not be able to break those down enough.
Starting with this basic guide, you can hardly do wrong otherwise: just throw back into the composter what did not compost yet into humus when you harvest. You will recognize finished good compost pretty swiftly: it smells, looks, and feels just like good, humous earth.